How to Install a Capacitor to an Amp
Basics
- The purpose of the Power Capacitor
Capacitors are used as storage for electric voltage or power. That's why they're often known as power capacitors or power caps. Additionally, they serve to perform the decoupling task that is intended to reduce the sound of power supplies. It is typically found in audio equipment or other accessories, like an amplifier.
- Why Should Capacitors Be Used in Amp Circuits?
On the amp circuit diagram, the power cap is playing the power storage role in general, just like it does in a different circuit. It is superior to lead-acid batteries because of its low resistance inside that allows the battery to be charged and provide energy at a fast speed. If you have a car audio system that is thought to have power-hungry components it is expected to generate a substantial amount of current demand is anticipated and if you're heavy metal or hard-rock enthusiast, music like bass and drums could increase the typical demand in a flash.
- When is it time to replace the Capacitor in Amp Circuits?
When it comes to the power capacitor is involved, there is rarely a problem when a capacitor is qualified. The electrolytic capacitors can decline as time passes. In reality, it takes more than 10 years to develop, and that's more than the average person has an amplifier. The power cap may be required to be replaced if you notice that your audio devices struggle to function normally (i.e. an audible buzz or hum coming off the amplifier).
According to some audiophiles, the power capacitor isn't essential. They'd rather have the huge three-upgrade that concerns the amp and the cycle battery.
How do you connect an Amp to a Capacitor?
Let's use an audio system in a car as an example to demonstrate exactly how to connect the capacitor into an amp.
Tools and Materials You'll require
*Capacitor(s)
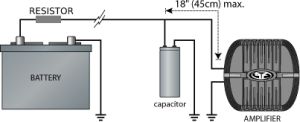
Easybom Easybomwould recommend a resistor of 1 watt to charge the capacitor. A lower-watt resistor could be too hot to handle. It is also possible to use the test light bulb, a traditional method.
*Wire
Make sure to use the same dimensions as the circuit on which the capacitor is meant to be placed.
*Wire stripping tool
*Adhesive eyelet connectors with heat shrink
Heat shrink connector butt and terminals
*Wrenches
*Memory saver
Step-by-Step Instructions
1. The capacitor must be discharged which is to be used. Place your car in a dry and quiet location where you will not be interrupted by other drivers. Unplug the battery ground terminal.
Step 2: Disconnect the fuse and replace it with a resistor. Set up the memory save. Follow your instructions from the manufacturer for the device.
Step 3: Unplug the battery cable to its negative end.
Step 4: Locate exactly where power source circuits are located. This is the place you'll need to install or replace the capacitor.
Step 5: Use the wire stripping tool to cut the positive feed wire for the circuit. Trim off the insulation on both sides of the wire you just cut.
Step 6: Attach an eyelet to one of the wire ends.
Step 7: Connect the feeding wire on the positive terminal of the capacitor that powers it.
Step 8: Position the capacitor as you can as the amp to lessen the sound. This is also a requirement of the instructions of the manufacturer.
Step 9: Connect the second section of the wire following this diagram. Make sure to use a wrench to secure each terminal nut.
Step 10 The wire should be grounded and then attach the negative battery cable.
Step 11: Remove your memory saver.
Step 12: Get started with your vehicle and the capacitor will be charged, and you will be ready to go.
Summary
It is important to charge the capacitor before any further procedures. Also, seek help from an experienced mechanic if uncertain about the issue.